Tuesday, July 28, 2015

Rustic Road

I feel like I've come full circle knitting a vest for my father in the very yarn I knitted my first adult garment in 30 years ago.
The very first adult garment I ever made was a basic drop shouldered jumper for myself in Southlander Bark.  I'm sure you'll remember the style, basically two rectangles, with minimal shoulder and neck shaping and truncated trapezoid sleeves and single ribbing.

Little has changed with the range in over 30 years - over dyed colours were introduced in 2007
 Pretty much every shepherd I every knew growing up in the back blocks had one of these, often homespun, that their mothers had lovingly crafted for them for their first shepherding gig.  It was warm, indestructible and gets softer over time and with wear.  Worn about 2 to 3 sizes too big over baggy jeans which almost fell off the hips with their first cheque book poking out of one back pocket and their loose tobacco in the other.  These jumpers survived cold sleety days on the farm, muddy weekends at the dog trials & then the rambling at the pub afterwards.

A stunning Southlander blanket knitted as a birthday gift for a very lucky husband.
When I was 13 this was the logical garment to make as my first graduation from a scarf.  Fashions have certainly changed, Aran and cabled jumpers are now more likely seen on the high street not the high country, but what hasn't changed is Southlander - the wonderful rustic New Zealand yarn staple which is just as fabulous today as it was all those years ago.

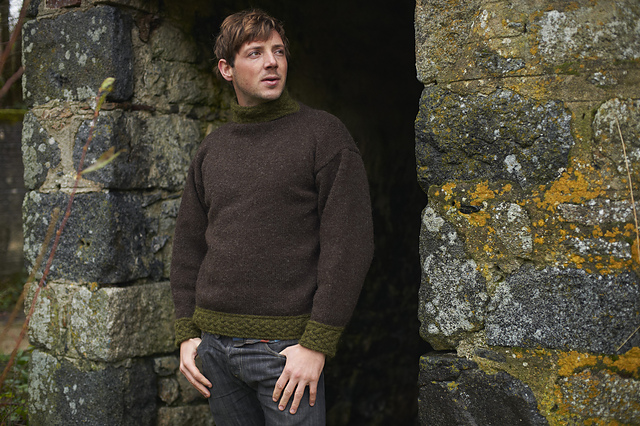
The modern take on the classic style - Southlander Bracken
Which is where I found myself today, knitting a vest for my father to wear under his overalls as he works in the chilly woolstore or out on his small block at home.  I knitted one for him 6 years ago, which he loves and he's requested another.  Now, like all those years ago, I just love knitting with this yarn.  It's not the super soft, super smooth yarns that we have become spoiled with in recent years.  It's honest, rustic, knits with that slight grippiness that means that those stitches will meld together and staying looking good decades after they come off the needles.
A modern twist on the drop shouldered style I first knitted all those years ago
Southlander is just as relevant today as it was all those years ago, helped in no small part by all the wonderful awareness around wool yarns done by The Campaign for Wool.  This style of yarn is the one that is most prevalent in northern Great Britain, Iceland and parts of Scandinavia & classic designs heralding from these regions are experiencing a renaissance in fashion today.
Southlander Bark - 200gm hank 400m NZ Wool Aran/DK
So if you find a hankering to pick up the needles and cast on a class 'Kiwi Jumper' or a more detailed Aran sweater, don't forget Southlander - Keeping kiwi's warm for over 30 years!

Tuesday, July 14, 2015

Thou, Nature, art my goddess...

The Zesty Lime slub created at home with food colouring.
As promised from last week I did indeed take home some yarn and armed with the two tutorials that I posted I thought it was prudent to test the hypothesis of "dying yarn at home is a doddle".  I took home a 200gm skein of a new wool slub (coming to Naked Skeinz very, very soon), 2 balls of Heritage Polwarth Ecru and a ball of Silver Lining Clifton Stone.

This is what I started with - a mixture of smaller balls and a skein of  Naked slub.
I chose 50gm balls, as I thought this was a great way for me to test the principles without committing to a larger skein.  I also wanted to see the difference the outcome was on a natural cream colour versus a natural oatmeal shade.  The first step was to skein off the balls.  I have a niddy noddy at home, but this can be easily done with wrapping the ball between your hand and elbow.

A collage of the process from soaking, colouring and the finished product
I chose Turmeric for the small skeins and food colouring for the slub (the slub was made with machine washable fibre, so best suited to the food colouring).  Following the processes in the tutorials I was totally amazed at how simple and straight forward it was.  I preferred using the food colouring, I used just green and yellow colouring.  It produced more intense colours and less mess.  It was also a shorter process, just soak, dip/soak in colour and vinegar solution and zap in the microwave few a few minutes to set the colour.

The turmeric took a little more washing & rinsing, but still great results.
The turmeric took more dedicated washing because it I needed to remove the powder from the yarn, however if you used natural colours in liquid form, like beetroot juice, you wouldn't have that hassle.
I was so encouraged with the success of the experiment I then dug out a part come of natural ayrn I had in the back of the stash cupboard and skeined it off to have another go.

Not bad for ninety minutes work.
This time I limited myself to black & yellow food colouring playing around with differing dilutions of the black and then pouring over a mixture of yellow just before microwaving.  The effect was unexpected and pleasing, and I guess that is the entire key to doing it yourself at home.  Having fun, playing about and being happy with the results, regardless of how unexpected!

My second attempt using food colouring - using just black & yellow.
To win a Mystery Pack of Naked Skeins yarns - make sure you post your attempts of home dying.  You can do this on the thread at our Facebook page or Ravelry Thread.  The prize will be drawn in the first week of August.

Tuesday, July 7, 2015

Wool of Bat and Tongue of Dog....

Lichen dyed Skeinz Organic Merino by Amy Van der Laar
 I have been so inspired by some of the entries we have received in this months draw for the Mystery Naked Skeinz parcel.  What has delighted me so much is the level of experimentation and fearlessness that is going on in your yarn kitchens at home.  So I thought I would share some of these great entries here and hopefully encourage you to give it a go at home.
Examples of natural plant dyes from South America
Hand dying yarn need not be a highly industrial process like we do here, the Romans and South Americans have been doing it for thousands of years & many dye stuffs can be readily found in the Kiwi kitchen.  Without going into the full process here, you can have a tremendous amount of fun dying your own yarns at home with a few simple ingredients.

Amy aka Phancee on Ravelry is a knitter & blogger achieved this with pantry cupboard food colouring
Food colouring is the obvious starting point for many.  They are easy to obtain and you have the full basic colour spectrum to be able to mix your own special colours.  You also don't require too much equipment and I have seen tutorials that enable you to dye with food colouring using your microwave!  This would be a really fun school holiday activity if you had crafty children at home.

Fleur aka craftygirl34 on Ravelry is achieving some stunning colours using Food Colouring
Also in the pantry is Turmeric, onions, Paprika, coffee, tea, even red cabbage, all can create wonderful colours.  This tutorial is one of the better ones that explains the differences in natural dyes, whether you need to add a mordant or not.  They use fabric in this video, but the principles are the same for wool.
Doe Arnott from Oamaru has perfected the natural dye process to a commercial scale
I know from social media postings I have seen within the groups I frequent that some incredible dying is going on.  If you find purchasing a pack of Naked Skeinz yarns too daunting for your experimentation, you can actually purchase some other Skeinz yarns in balls or hanks to play around with.  I suggest the Heritage Polwarth Ecru, Perendale Cream, Southlander Cream as small amounts of yarn to fiddle around with.  The balled yarns will have to be made into a hank, but that can be done my winding the yarn around your forearm and securing it with waste yarn to make a small hank.

Southlander Cream is a perfect yarn to tinker around with for dyeing beginners.
I am going to experiment at home using some Polwarth Ecru and Silver Lining Clifton Stone & dye using food colouring and then Turmeric to see how easy the process is and what results I achieve.  I'll report back next week and I hope I can inspire you to give it a go at home and share your exploits on the Facebook Thread or on our Ravely Forum. Wish me luck!